Friday, June 30, 2017

C.C. Designs: FOREST PIXIE Pop-Up Box Card

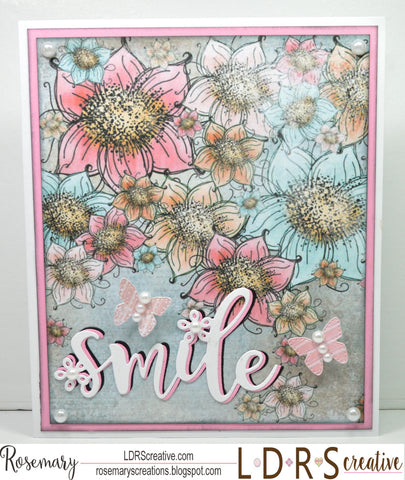
Happy FRIDAY everyone! I hope you had an awesome week so far! Thank goodness it's Friday and the start to the weekend. Today I decided to venture out of my comfort zone and make a different kind of card. This one is called a Pop-Up Box Card. I created this cute scene using the Little Pixie Forest Pixie Stamp Set along with the Make A Card #13 Metal Die and Make A Card #16 Summer Metal Die.
 
 Copics:
Skin: E000, E00, E01, E11, E04
Hair: Black, C9, BG18, BG13
Wings: BG10, BG32
Shirt: RV02, RV09, BG10, BG18
Skirt/Socks: BG10, BG13, BG15, BG18
Shoes: C3, C5, C7, C9
Fox: E15, E18, E09, E41, E42, E43, R11, R20, R22
Tree Stump: E25, E29, E39, E59
Snail: YG93,YG95, YG99, E84, E87, E89, E57

The sentiments are from the Forest Pixie Set and Happy Sentiments. I used the Layering Tags Metal Die to cut out the sentiments and matted them on yellow cardstock. To adhere my patterned paper to my project I use my Xyron Sticker Maker. I love to run all the cut patterned paper through my machine so I get an even layer of adhesive on the entire surface. It makes assembly of the box go a lot faster!


Now be sure to head over to the C.C. Designs Store and snatch up all of the awesome goodies! A lot of these items are being CLEARANCED OUT to make room for all the new exciting stamps and dies that are coming!!

Hugs,
Rosie

Thursday, June 29, 2017

I Am Roses + Conie Fong Little Blossom

Happy Thursday everyone! I hope you are having a great week so far! Today I'm showcasing the beautiful paper flowers from I Am Roses with Conie Fong's Little Blossom. I love all of Conie's digital stamps and this one is so pretty! I colored the image with Copic Markers.
 
Copics:
Skin: E000, E00, E01, E02, E11, E13
Hair: Black, C7, C3, B26
Blue: B23, B26, B29
Pink: RV02, RV04, RV06, RV09
Teal: BG32, BG34, BG18
Shoes: Black, C5, C7, C9
Gold Marker
 
And now for the star of the show....these are the beautiful I Am Roses flowers used on my card:
  S10-427 Small All Mixed Paper Flowers  


  Now, don't forget to come play along with us on the IAR Challenge Blog using flowers from the IAR STORE. You have until JULY 8th to link up your project, but remember you must use at least 2 items from I Am Roses. There are 4 prizes to be won so I hope you join us!!
 
Hugs,
Rosie

Tuesday, June 27, 2017

The Greeting Farm: Light of the World and Ask Seek Knock

 
Happy Tuesday everyone! Today, I'm showcasing the NEW Faith Stamps from The Greeting Farm. These Faith-based stamps will be releasing every other month on the last Tuesday. The next release will be in August so make sure to mark your calendars!
This release features Light Of The World and Ask Seek Knock. The great thing about these sets is their versatility! You can do bible journaling pages, cards, bookmarks, mixed media....the list is endless.
 
I decided to make a card along with a matching bookmark. For the card, I used the LIGHT OF THE WORLD Stamp Set. To make the light bulb, I just free-handed the design with a gold marker. Next, I stamped the sentiment using Versamark Embossing Ink. Then I picked up various chalk colors on a cotton ball and rubbed it over the sentiment. I did the same to make the background paper.
 
 
 My next project is a matching bookmark, using the ASK SEEK KNOCK Stamp Set. For the bookmark, I embossed the cross in gold embossing powder. I did the same technique with the chalk on the strips of color. Then I stamped the words over the chalk....easy peasy!
 
 
Here is a picture of the card and bookmark set together.

 
 Head over to The Greeting Farm Store to snatch up these awesome sets!! You can see more inspiration from my fellow DT sisters HERE!
 
Hugs,
Rosie

Sunday, June 25, 2017

7 Kids Your Crafting Store: Under the Sea Watercolor Background Tutorial

Happy Sunday everyone! Hope you are having an awesome weekend so far! It's Rosie here today sharing a tutorial on an under-the-sea watercolor background I made for a recent card on my blog.


I used these awesome metallic ink pans from Prima Marketing Metallic Accents. I LOVE these! The colors are so pretty and bright and versatile for so many different applications!


These are the gorgeous metallic colors in the set.

I start of with a wet paintbrush and add water along the bottom edge to make the coral or seaweed.

 I used this pretty green. You have to add quite a bit of water to the pans and mix to activate the paint.

 I then go over the wet lines of the design with the metallic watercolor and just freehand the parts that branch out.

I use a heat gun to speed up the drying process.

This is the metallic blue I used for the water.

I wet the paper first at the top and then add the blue to the wet areas so the color spreads easier.

You can see the pretty shimmer in this photo.

Here's another view. I would go over the green one more time just to darken it some more.

These metallic watercolors are also vibrant on dark cardstock! I use the paintbrush to do a little calligraphy to show you how awesome they really are on the black! I've got so many ideas for these fabulous ink pans.

You can check out all the amazing products at 7 Kids Your Crafting Supply Store HERE. And be sure to check out the NEW ARRIVALS section to see the latest items.

Hugs,
Rosie

Saturday, June 24, 2017

LDRS Creative: Eleganza Floral Stamps with Uptown Sayings

Happy Saturday everyone! My little boy, who is not so little anymore, turned 11 years old on Wednesday, and today we are having his birthday party with all his friends. They really do not lie when they say time passes by quickly. I look back on older pictures of him and can't believe 11 years have passed! HAPPY BIRTHDAY BABY BOY! You are an awesome kiddo, and I'm so blessed and proud to be your mom! Love you!


 Today, I created this floral circular card for LDRS Creative using various products from the store. I've been seeing a lot of calligraphy inspiration on Instagram with floral circle frames and a calligraphy sentiment in the middle so I decided to create a similar effect using the stamps and dies from LDRS Creative. I first stamped the flowers from the Polkadoodles Eleganza Stamps and Dies Set on some of the Polkadoodles Eleganza Paper with Versamark and heat embossed them in gold. After I cut them out with the enclosed dies, I added dots to the center of my flowers using two different yellow-colored sharpies. Next I grabbed some cotton swabs and added chalk to the petals.
 
 
The circle card shape and the gold leaves were made using the Creative Basics Grace Build A Card Die Set. The "Marvelous" sentiment is from the Uptown Sayings Sentiment Set.


The selection and variety of products have grown so you should definitely go take a look in the LDRS Creative Store, and grab all of your favorites! You're going to love them!

Hugs, 
Rosie

Friday, June 23, 2017

C.C. Designs: Sweet November MERMAIDS

Happy FRIDAY everyone! I'm back with a card for C.C. Designs using one of the mermaids from this awesome set called Sweet November Mermaids. I love mermaids, and the ones in this set are so AMAZING!! I stamped her on Cryogen cardstock, colored her with Copics, and then added Wink of Stella Clear Glitter Marker over her top and tail for extra sparkle.

Copics:
Skin: E000, E00, E01, E11, E13
Hair: C9, C7, BG18, BG10
Eyes: BG10, BG32, BG18
Top: V12, V15, V17
Tail: BG18, BG72, BG10, V17, V15, V12, RV02, RV04, RV09
Wink of Stella Clear Glitter Marker
 
I used the C.C. Designs Windows Cutting Metal Die to make the open squares on the left. Then I added some fish patterned paper to the inside of my card so it shows through the squares. To make it more glittery, I added Wink of Stella Clear Glitter Marker over the patterned paper. 
 
 
 I then cut a piece of watercolor paper and used the PRIMA METALLIC ACCENTS Watercolor Paint Pans to paint the background. I LOVE these watercolor cake pans. They are easy to use, very shimmery, and are totally AWESOME!!


Now be sure to head over to the C.C. Designs Store and snatch up all of the awesome goodies! The stamps are so much fun to color up!

Hugs,
Rosie

Wednesday, June 21, 2017

The Greeting Farm: Text Me Anya!

Happy Wednesday everyone! Today, I'm featuring this awesome clear stamp set from The Greeting Farm called Text Me Anya and her coordinating Die Cut:


  She so adorable! I love the sentiments that come with her too! I stamped her on X-Press It Blending Card and colored her with Copics.

Copics:
Skin: E000, E00, E01, E11, E13
Hair: C3, C5, C7, Black
Shirt: RV02, RV09, BG32, BG78
Skirt: BG32, BG72, BG75, BG78
Shoes: RV02, RV04, RV09

The sentiment and confetti paper came from a new pad I just bought at Michaels called DCWV Confetti 12x12 Paper Pad. The corners were made using a Whimsy Stamps Die. The ribbon and pearls were from my stash.


All of the stamps from the June Release are available for purchase in The Greeting Farm Store HERE. Remember, there is currently a TGF BLOG HOP you can participate in for a chance at winning the entire JUNE Release. 
 
Hugs!
Rosie

Tuesday, June 20, 2017

The Greeting Farm: Mega-Mini Go Time

Happy Tuesday everyone! Today, I'm featuring this awesome clear stamp set from The Greeting Farm called Mega Mini Go Time and the coordinating Die Cut!

 
As you can see, this awesome set has so many elements that you can combine together to create a fabulous scene! I LOVE this set!!

Copics:
Skin: E000, E00, E01, E11, E13
Hair: Y20, E71, E77, E79
Purple: V12, V15, V17
Green: YG23, YG25, YG67
Boots: C7, Black
 
I created my scene using the Lawn Fawn Stitched Tree Borders Die. The patterned paper is from Doodlebug Under The Sea 6x6 Paper Pad. I raised the Mini Anya and the Vespa on pop-dots for added dimension.
 
 
 All of the stamps from the June Release are available for purchase in The Greeting Farm Store HERE. Remember, there is currently a TGF BLOG HOP you can participate in for a chance at winning the entire JUNE Release. 
 
Hugs!
Rosie

Sunday, June 18, 2017

7 Kids Your Crafting Supply Store: DREAMERLAND CRAFTS

Happy Sunday everyone! Before I get to my card, I just wanted to let you know that we will be playing games on the 7 Kids Customers Create Facebook Page today at 4pm CST for a chance at winning some awesome FREE Product!! Come join us for some FUN!


 Today, I'm featuring a stamp from Dreamerland Crafts called Can't Say Enough. I picked this stamp because it's FATHER'S DAY, and this image reminds me of myself and hubby! There really are not enough words to say how good of a father my hubby is. He truly LOVES his family and does anything and everything for us. I appreciate all the hard work he puts in to make our lives better each and every day. He is truly a blessing not only in our lives, but to all the people he comes across. I really am a lucky and blessed woman to have this man by my side. HAPPY FATHER'S DAY HONEY!! <3 div="">
 
 I used the Avery Elle Wonky Stitches Die Set to cut the banner for the awesome sentiment. The shape of the card was made using LDRS Creative Allifair Build A Card Die Set
 
Don't forget about our current ANYTHNG GOES Challenge on the 7 Kids Challenge Blog. Just click on the link on the Challenge Blog (right side bar) to upload your card for a chance at winning a $20 gift certificate to the store! Please use products from the 7 Kids Store on your uploaded projects.
 
Have a great Sunday my friends!
Rosie

Friday, June 16, 2017

The Greeting Farm: Call Me Ian!

Happy Friday everyone! This week felt like it flew by, but I'm not complaining because it's the start of the weekend! And to top it all off, I have this card today featuring this adorable guy from The Greeting Farm called Call Me Ian along with his coordinating die cuts:


I stamped Call Me Ian on X-Press It Blending Card and colored him with Copics.

Copics:
Skin: E000, E00, E01, E11, E13
Hair: E42, E77, E79
Gray: C3, C5, C7
Red: R27, R39, R59

I used two pieces of patterned paper in my stash. The CALL ME is heat embossed in black on the gold heart. Pretty easy peasy!


All of the stamps from the June Release are available for purchase in The Greeting Farm Store HERE. Remember, there is currently a TGF BLOG HOP you can participate in for a chance at winning the entire JUNE Release. 
 
Have an awesome weekend!
Rosie

Thursday, June 15, 2017

I Am Roses JUNE Challenge: ANYTHING GOES!

   
It's a new year so we changed up the monthly challenge. The rules are still the same BUT instead of 1 Prize, we will have 4 Prizes up for grabs!!

Here is the breakdown:
WINNER (Chosen at Random) $50 Voucher

Top 3 (1st Place) $30 Voucher
Top 3 (2nd/3rd Place) $25 Voucher


Isn't that fantastic! If that's not motivation to enter then we don't know what is! Can't wait to see your creations using I Am Roses Flowers! First, here are the Rules:

Here are the Details/Rules
  • Contest runs JUNE 15th - JULY 8th (Ends 11:55pm PST)
  • Theme: "Anything Goes"
  • Minimum (2) I Am Roses Products
  • One project submission per participant
  • One winner will be chosen
  • Participants will upload their project to their blog or forum, Label it “JUN IAR Challenge
  • Participants will add a direct link to their project using the InLinkz tool provided. (*if you are unable to use the tool, leave a comment to this blog post and leave a direct link to your project)
  • Must Subscribe/or be a Follower of the IAR Challenge Blog
  • Winner will be announced alongside the next NEW monthly challenge on the 15th  
 Today, I paired my I Am Roses flowers with this adorable bear from Conie Fong Art and Design called Bella. I just love her! She's stamped on Xpress It Blending Card and colored with Copics.
 
Copics:
Bear: E41, E42, E43, Colorless Blender
Heart/Ears: R11, R20, R22
Pink Dress/Bow: R81, R83, R85, R39
 
I decided to make another altered 8x8 wood frame to showcase these gorgeous I Am Roses flowers:
R6-15 White Mulberry Roses
 
I inked the edges of my paper with Tim Holtz Walnut Stain Distress Ink. The panel behind my image was cut out using LDRS Creative Fancy Rectangles and Layers Die Set. The rest of the items came from my stash.
 
 
Now, don't forget to come play along with us on the IAR Challenge Blog using flowers from the IAR STORE. You have until JUNE 8th to link up your project, but remember you must use at least 2 items from I Am Roses. I can't wait to see what you make!
 
Hugs,
Rosie

Friday, June 9, 2017

LDRS Creative: SMILE!

Happy Friday everyone! Today, I'm sharing a card for LDRS Creative combining the Polkadoodles Eleganza Paper with a couple of LDRS dies. As you can see, the variety of products in the store allow you to create many different types of cards....even elegant ones that don't require coloring.


I cut out the TLC Inspired SMILE Word Die in white, pink and black cardstock, then glued them together to create the layers. The butterflies are from the Creative Basics Dotted Wings Die Set. I added pearls to finish off the card.


The selection and variety of products have grown so you should definitely go take a look in the LDRS Creative Store, and grab all of your favorites! You're going to love them!

Hugs, 
Rosie